"Friendship is born at the moment when one person says to another, 'What! You too? I thought I was the only one'."

Sunday, September 12, 2010

Joyeux Kitchen: Love-My-Husband Delicious Soup

A few years ago, Doug mentioned this soup as being one of his favorites, and I was searching for new recipes to add to the usual weekly meal rotation, so I thought I'd give it a try.  Not everyone is crazy about the idea of ground meat in a soup (myself included) but it has become a favorite of the whole family.  The recipe is from Doug's Great Aunt Ann.  The girls call it 'orange soup' and Hannah loves it; it's one of those ultimate comfort foods. 

You'll need:
  • 1 lb lean ground turkey (or super lean ground beef, but I prefer the turkey)
  • 1 medium chopped sweet onion
  • 2 cans cream of celery soup
  • 3 cups V8 juice (I like the Hot & Spicy)
  • 3 cups grated carrots
  • 1 cup water
  • 1/4 tsp pepper
  • 2 bay leaves
Brown the meat and onions (drain if needed, but if you use super lean meat there won't be a lot of fat to drain off).  Add the remaining ingredients, stir, bring to a boil, and then simmer 2-3 hours.  Great Aunt Ann recommends adding 1/2 lb hot italian sausage as an option.  Also, sometimes I substitute 1 cup grated parsnips for 1 cup of the carrots.  Dinner accomplished.  Super easy! 


Betty Crocker's Best Dinner Rolls

You'll need:
  • 3 1/2 to 3 3/4 cups all-purpose flour or bread flour
  • 1/4 cup sugar
  • 1/4 cup butter, room temperature
  • 1 tsp salt
  • 1 package regular or quick active dry yeast (2 1/4 tsp)
  • 1/2 cup very warm water (120-130 degrees F)
  • 1/2 cup very warm milk
  • 1 large egg
  • Melted butter
Mix 2 cups of the flour, the sugar, 1/4 cup butter, salt and yeast in a large bowl.  Add warm water, warm milk and egg.  Beat with your mixer on low one minute, scraping bowl frequently.  Beat on medium speed one minute, scraping bowl frequently.  Stir in enough of the remaining flour to make the dough easy to handle. 

Next you can do one of two things: knead the dough by hand 5 minutes on a lightly floured surface, or knead in your KitchenAid with the bread hook for 5 minutes (I opt for the bread hook).  Place the dough in a large bowl greased with shortening, turning dough to grease all sides.  Cover loosely with plastic wrap and let rise in a warm place about 1 hour or until double.  Dough is ready if indentation remains when touched. 

Grease a 13 by 9 inch pan with shortening.  Push fist into dough to deflate.  Divide dough into 15 equal pieces; shape each piece into a ball and place in pan.  Brush with melted butter.  Cover loosely with plastic wrap and let it rise again in a warm place for about 30 minutes or until double.

Heat oven to 375.  Bake 12 to 15 minutes or until golden brown.  Serve warm or cool (we like them with honey butter).
Look!  My new oven mitts!

Friday, September 10, 2010

Joyeux Kitchen: Pumpkin Chocolate Chip Cookies

"They were delicious.  As far as pumpkin-anything goes, these are the best I've ever had." (said by Doug, after eating a cookie under duress, because he hates pumpkin-anything)

How many desserts can I put pumpkin into before the end of September?  Stay tuned.  This one is incredible, from George Duran on the Food Network.  As a cookie they're a hard 10, but the dough.... oh the dough.  Like heaven.  I would serve it at a party with a spoon and a hot cup of coffee. 

You'll need:
  • 1 cup (2 sticks) of unsalted butter at room temperature
  • 1 cup white sugar
  • 1 cup brown sugar
  • 2 large eggs (room temperature--trust me, all baking ingredients should be room temperature)
  • 1 tsp vanilla
  • 1 cup canned pumpkin puree
  • 3 cups all-purpose flour
  • 2 tsp baking soda
  • 1/2 tsp salt (1/4 tsp if you use salted butter)
  • 1 tsp cinnamon
  • 1/2 tsp ground ginger
  • 1/4 tsp ground nutmeg
  • 1/4 tsp ground cloves
  • 2 cups (12 oz. bag) milk chocolate chips
  • Nonstick cooking spray or parchment paper
Heat the oven to 350.  Spray your cookie sheets with cooking spray or line them with parchment paper (I use parchment paper--no pans to scrub!!).  Beat the butter in your mixer until smooth.  Add both sugars and cream on medium speed until light and fluffy (3-4 minutes).  Add the eggs one at a time, then the vanilla and pumpkin.  Mix all your dry ingredients in a bowl and add slowly to your wet ingredients.  Stir in the chocolate chips.  Scoop the dough by heaping tablespoons onto your cookie sheets and bake for 15-20 minutes, or until the cookies have browned around the edges.  Remove sheets from the oven and let them rest for 2 minutes.  Then take the cookies off with a spatula and cool them on wire racks. 

These cookies are super soft and gooey.  I made the mistake of putting them in a Ziploc after they cooled, stacking one on top of another.  They're still edible but they aren't pretty anymore.  I'm thinking about crumbling the whole mess up and putting it on top of ice cream (and then going for an 8 mile run).  For storage I'd recommend layering them between sheets of wax paper in an airtight container.

This recipe was from a Food Network special (called Ham on Turkey?).  All the recipes from this episode sound incredible; for a list click here.

Thursday, September 9, 2010

Green Bunny: Baby Name Art

I felt a creative urge when Sarah was pregnant with her third baby girl and [GASP] I was throwing the baby shower. Pottery Barn Baby was consuming my every thought. I was trying to emulate some of the adorable artwork on the bedroom walls in the 'I-want-it-all-please' catalog...
In explaining my love for all things Pottery Barn, I am reminded of an oh-so-classic Friends moment from 'The One With The Apothecary Table':

Ross: Phoebe HATES Pottery Barn???!!! She's so weird.
Rachel: Ross, she’s not weird, she just wants her stuff to be one of a kind.
Ross: Huh. Ya know what’s not one of a kind? A twin!
Anyway, back to the artwork, here's what I came up with:

This is 12x16. I framed it in a cream IKEA frame and displayed it on the table using a plate rack at the shower and then sent it home with Sarah...along with two others for Haley & Hannah!


This spiraled into making one for our MOPS auction:


and, one for my son (this one is 9x9):


Involved some cutting, some sewing, some chalking, some drawing, some tearing, some sanding, some major creative drive. All except for 'Kathleen' were before I owned my Cricut. (Yes...those are hand drawn and cut letters, flowers, birds, trees & bugs folks!) This is something I hope to include in my custom-made options when I launch Green Bunny Art....super fun project!

Wednesday, September 8, 2010

I'd Like To "Ask The Audience" Please: It's A Celebration Situation!

I've been going back and forth about this for a while, so I thought I'd bring it to the blogosphere and see what everyone else thinks.  The girls birthdays are in October, November, and December.  Last year only Holly got a big party because it was her 1st birthday (and that's a pretty special day!), but this year we're having a combined party for all three girls in early November for our family and close friends.  We chose to go this route because inviting people over three months in a row for a party sounds a little excessive.  I know some people choose to only let one kid have a party each year in rotating fashion, but I got a party every year so I'd like to do the same for them (and besides, let's face it, I live to throw parties :).
Mud Pie Cupcake Birthday Hat
I have some questions about birthday etiquette and I'd love your thoughts.

Friends:
Do we invite the girls' little friends to this party, which will be on a Saturday late afternoon, or plan separate, more casual get-togethers for their friends closer to their actual birthdays?  We have a lot of family close, so inviting only our closest friends and family still adds up to nearly 50 people (if everyone came, which they won't).  Tacking on additional kids' friends to this list boggles my mind--we simply don't have room for it.   However, the thought of this big party plus at least two little party-type-occasions is also mind-boggling. 

Gifts:
We want people to come celebrate birthdays with us, but if I got an invite to a party for three children, I'd feel obligated to bring three gifts and would probably feel burdened by this, given the current economic climate and the season of life we're in.  I don't want anyone to feel burdened!  So should I say "No Gifts Please"?  If I got an invitation to a kid's birthday that said "No Gifts" I'd bring one anyway.  Should the invite perhaps say "Gifts Optional"?  Well, really, gifts are always optional, so that sounds sort of rude.  So what I've been thinkin' is that I'll include a little note that spells the whole thing out and goes something like this:
"We are so excited to have everyone come celebrate with us. We will provide drinks and dessert, come ready to have a great time! We realize that celebrating 3 children at once is a little unorthodox, but their birthdays are so close together that it seemed like the easiest way to do things. Please don't feel obligated to bring three gifts. They like all the same things and are happy to share a gift between them, and mostly they'll just be happy to see all of their favorite people in the same room. Hope to see you there!" 
Is it presumptuous to assume anyone would even consider bringing three gifts?  Is saying nothing at all the best thing to do?  Any thoughts or advice would be fabulous.

I did find a couple of great websites for party etiquette, listed below.

Hosting A Birthday Party: Proper Etiquette and FAQs

Children's Birthday Party Etiquette from ModernMom.com


Joyeux Kitchen: Laura's No Bake Cookies

Everyone has their own version of this classic recipe, but this one from Doug's mama is our family's favorite.  So easy and fast to whip up!  The only problem is how quickly they disappear. 
You'll need:

  • 1 stick of butter

  • 3 tbsp cocoa

  • 2 cups sugar

  • 1/2 cup milk

  • 1/2 cup peanut butter

  • 1 tsp vanilla

  • 3 cups oats
 Combine the butter, cocoa, sugar and milk in a pot on the stove and bring to a boil for one minute.  Remove from heat.  Add peanut butter, vanilla, and oatmeal; stir quickly and drop by spoonful onto wax paper.  This sets up fast so don't dawdle.  Enjoy!  [Note: I like to sub a cup of chopped pecans for a cup of the oats, it makes for a crunchier cookie with a nice flavor.]
Love cookies?  Read about The History of The Cookie here.

Monday, September 6, 2010

Five Favorites + Five More [Oh Baby]

Happy LABOR Day!
How fantasticly timely this is since I was gonna write about babies and gifts! (I do realize this day celebrates a different kind of labor, but just go with it!)

We have three little bundles of joy joining our family in September (one yesterday and two in the next two weeks!). I will be an auntie to another niece and two nephews. YAY! All this baby talk got me thinking about the best go-to baby gifts. The things my babies loved...the things I loved...that I want to pass on to you...well, to everyone really!

This started out as a 'five favorites' list, but as mommies of five babies who have been doing this for almost five years...there were just too many fabulous things to discuss! Here are our favorites in no particular order:

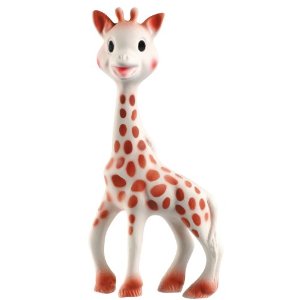
(This link goes to our FAVORITE local baby boutique called SugarBabies. They included great info about Sophie on their webpage.) Made of 100% natural rubber and food paint. BPA free. Carter still loves her as we move into the second year.
Price: Varies depending on where you shop, but usually somewhere around $20. Both Target (online only) and Amazon carry her for cheaper than specialized baby boutiques.


I received this as a gift when I was pregnant with my first baby. It is a wonderful book filled with poetry, songs, recipes, and stories. It is perfect for the first timer who has forgotten all these little treasures during her years between being a baby and having a baby. There is a new 10th anniversary edition that sells for $25 at Borders. This is a picture of the original copy. Just because it's the one I own and it has a special place in my heart!


These items from Pottery Barn are SO soft and cozy! Warning: there is no turning back! I received two fitted sheets for Carter and I NEVER want to put regular cotton on his crib mattress anymore.
Price: $19.00 Changing Pad Cover
$29.00 Fitted Crib Sheet
$25.00 Boppy Slipcover


These are AMAZING! Let me say that again...AMAZING! They are huge, lightweight, breathable, 100% cotton Muslin fabric that just get softer and softer as you wash them. We never had loose feet or that one random wiggle arm when Carter was wrapped up in these. Super cute too!
Price: Again, varies based on where you want to buy...$33.69 for a four pack on Diapers.com


These floppy, snuggly guys are a favorite in Sarah's house. Each of her girls had one from birth and, I believe, Holly is currently loving on 'duck' number 4? This is a local company with a wonderful story.
Price: As much as we love Bunnies By The Bay, Sarah would like to point out that if you order from them you pay $10 shipping on top of the $10 price tag, but you can pick one up from Sugarbabies for $8.99 if you're local!


Melissa & Doug ANYTHING!
Great educational toys that the kids LOVE. So many puzzles, food play sets, blocks, classic toys & art supplies that we love here...the list goes on and on. The magnets above are a favorite in our house. Mommy loves them because they don't scratch the fridge like other magnets do. (We also play with them on cookie sheets.) 
Price: $11.99 for 20 animal magnets


Oh Plah! Teething Cuff by Roundhouse
Alas, this is one item Sarah and I never experienced (doing a blind review here). Don't know if they are fairly new or if we were just in the dark, but they look fabulous! You know when you are trying to finish a sentence with a friend at a coffee shop/playdate and your little one just wants to eat your jewelry...voila! Take off your bracelet and hand it over with no fear! BPA free & completely recycleable.
Price: $19.99


These are literally THE BEST thing ever when you are mixing kids + summertime. They clean up in the sink with dishsoap and hot water, slip on and off super quick (the kids can do it themselves), come in fun, fun, fun colors, have good grip on slippery surfaces, and don't get me started on jibbitz! My boys wear them all summer long.
Price: $24.99 (a little less on Amazon)


I swear by these things. They are not cheap, but are totally worth it. At any given moment I have a pack in my cupboard, car, diaper bag...you name it. They are extra soft and made with saline that dissolves mucus. As a first timer, I wiped and wiped and wiped Logan's little nose with regular baby wipes when he had a bad cold and ended up with a red, raw, horribly painful nose situation. NEVER happens with boogie wipes. You can find them in the baby aisle at Target, Fred Meyer, Walgreens...
Price: $3.99 for 30 wipes


We enjoy the "That's Not My..." series, but all Usborne touchy-feely books are equally delightful!
Price: $8.99

...I could probably keep going, but I'll stop at 10 great baby buys. Hoping you feel armed and ready to venture out on your next baby shower shopping adventure. Or...if you're a mama who just HAS to have one of the above goodies...enjoy! Let us know what your favorites are too.

Saturday, September 4, 2010

"Glamour"ous!


After our trip to Bermuda, Lindsay sent a photo off to Glamour magazine for the "Where Has Your Glamour Been?" section, without any real expectations of actually being published. She corresponded with an editor there a couple times providing more information about us, but never got a definite confirmation that our picture was in an upcoming issue. We'd sort of forgotten about it, and then today, wandering through Borders enjoying a Mommy's-Day-Out, Lindsay spotted Lea Michele on a cover and said, "Oh she looks cute! Oh hey Glamour! I wonder...."

And there we were. Page 46. We caused quite a scene--I remember squealing, alarming innocent customers and jumping up and down in the middle of the store. "That's us! We're in here!" We bought five copies between us although we aren't really sure what to do with the extras at this point, but hey!--how often do you wind up in the pages of national fashion magazine with the likes of Kristin Stewart and our favorite Glee star? And how appropriate, we're in the October issue and Lindsay's birthday is October 15th!


Friday, September 3, 2010

Joyeux Kitchen: Perfect Pumpkin Cream Cheese Muffins (If you call it a muffin it doesn't count as dessert!)


**I know the ingredient list looks long-ish, but I made them with time to spare over naptime while baby-sitting an extra 15 week old.  No worries.**

On Monday morning this week, I pulled eagerly into the Starbucks drive-thru on Kent's East Hill.  I was eighth in line, waited 21 minutes, and was rewarded with a Grande Nonfat Yes-Please-Whipped-Cream Pumpkin Spice Latte and a Pumpkin Cream Cheese Muffin that looked like it had gone for a roll in the hay with some buttered, sugared, (potentially fried?) pumpkin seeds.  Heaven.

Must.  Find.  Recipe.
 
I looked at a lot of different variations in my quest for the Perfect Pumpkin Cream Cheese Muffin, even some claiming to be 'just like the ones from Starbucks,'  and this particular confection from Country Living had everything I was looking for: a rich, cream-cheesy topping, a crunchy element, and just the right amount of spice.  I adjusted the recipe to meet my needs; originally it called for the cream cheese to be placed in the middle of the muffin, like a filling, but fillings disappear in the oven... I like it on top!  Also, I added more butter and less flour to make the streusel more streusel-y.  Grunt: More butter.  (That was a Home Improvement reference.)


(Makes 24 muffins.)

For the cream cheese topping you'll need:
8 oz. brick of cream cheese, room temperature
1 egg
1/3 cup sugar

For the crunchy streusel you'll need:
5 tbsp. sugar
1/3 cup flour
1/4 cup pecans, roughly chopped (I used my food processor)
4 tbsp butter, melted
1 tsp cinnamon

For the muffin batter you'll need:
2 1/3 cups sugar
2 cups flour
2 eggs
2 tsp cinnamon
1/2 tsp salt
2 tsp baking powder
1/4 tsp baking soda
1 1/4 cups solid-packed pumpkin
1/3 cup vegetable oil
1/2 tsp vanilla extract

Heat oven to 375 degrees F.  Pop some liners into two 12-cup muffin pans (or spray them with cooking spray, but liners work better).  Mix the cream cheese filling ingredients in a small bowl with your hand mixer and set aside.  Toss the crunchy streusel ingredients in another bowl (actually, I think using your hands works best for streusel--dig in there and mix it up good!) and set aside.  Combine the dry muffin ingredients first (sugar, flour, salt, baking powder, soda, and cinnamon) and in a separate bowl mix the eggs, pumpkin, oil and vanilla together.  Start your KitchenAid and slowly add the wet to the dry.  Fill your muffin cups (about 2/3 full) and top with 2 teaspoons of the cream cheese mixture.  Sprinkle some of the streusel on top of each muffin and bake until golden and a tester, inserted into the center, comes clean -- 20 to 25 minutes depending on your oven.  Cool on wire racks.  Sigh.  Happy September, everyone!

Thursday, September 2, 2010

Green Bunny: Boy or Girl?

The day before Carter's 20-week ultrasound, I was headed downstairs in my favorite blue maternity shirt from the Gap to take my 20-week belly pic. I was wondering whether the little peanut in my belly was a boy or a girl...the anticipation was killing me. Then, I realized I also had this shirt in pink (I tend to buy the same shirt in multiple colors when I find one I like). Decided it was a fantastic photo opp waiting to happen. I took one pic in the blue shirt...changed into the pink shirt...and took a pic facing the other direction. Then, I photoshopped the two pictures together to get this layout:


I posted the pic on Facebook the day we went to the doctor to let all our friends know it was almost time! This layout currently resides in Carter's baby book.

Wednesday, September 1, 2010

FiftyTinyToes In Paint


Since our moniker is FiftyTinyToes, some foot art seemed like a natural course of action.  I was inspired by a Facebook post (I know, shocker: moi, on Facebook?...) about an artist in Eugene, OR, who was demonstrating some foot-painting downtown; my cousin got to participate with her little ones.  She posted pics on Facebook and I thought it looked like great fun.  It was great fun... also a great mess.  The plan originally involved hosing the children off post-painting but the temperatures were sub-65 that day so we ended up lugging the five of them up to the master bath.  What a situation.  The plan also involved paint that advertised itself as "completely washable" and turned out to be anything but.  For those of you considering this project, I recommend Crayola Washable Finger Paints. 

Lindsay brought over disposable foil baking trays to pour the paint into and we used a large strip of white butcher paper as the canvas.  We helped them dip their tootsies in the paint and walk gingerly across the [taped-down] paper, and we had another strip of butcher paper and giant coloring-book pages waiting for them when they finished.  We're each going to keep an 11 by 13 inch section of the masterpiece--we captured a precious moment in their childhoods and they had a ball.  There was a time where the mess this project created would have sent me into full-fledged panic attack, but toddlers love making messes and lately I've been trying to embrace my inner Pig-Pen.  Try it with your kiddos this week!